
Bespoke Bobber Pan Seat (How I made it).
- Peter Smith
- Jan 22, 2023
- 4 min read
Updated: Jun 24, 2023

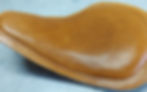
In this post I am sharing how I made a custom bobber seat for a BMW boxer, which the client was rebuilding as a bobber.
I worked with the client to get a feel for what he wanted. A simple pattern on the seat, dyed in brown and stitched. We wanted a seat that is not 'loud' or bold, with subtle details. I designed the seat with a thin edge and small stitches in mind.
Simple right?
Whilst It sounds simple, there are a lot of processes involved in making a seat like this.
The supplies for this job are
Steal seat pan (supplied by the client).
Leather
Foam
Rivets
Cling Film
Thread
Sedgewick Leather Care
Polish
Contact Adhesive
Spray glue - used in the upholstery industry
The leather I used is 2.5mm (6 oz) Badalassi Carlo vegetable tanned tooling hide, an exquisite leather to work with as it has been beautifully tanned and treated giving it a supple feel.
The processes for the actual build are many, so lets see if I can explain it.
Bond the foam to the seat pan using spray adhesive. The reason I use spray adhesive is because it is easy to apply to materials, gives an even and thin covering and bonds like crazy. I never use glue as a permanent solution. I use it to hold things in place whilst I build my item. It's the stitching in this case that holds the seat together.
Cut and shape the foam. I use an ordinary electric kitchen meat carver to cut my foam. Rasps are used to 'carve' and shape the foam to its final design. Then I spent half an hour cleaning up all the foam mess from the floor, the worktop and everywhere else it went!!
Cover the foam with Dacron - a polyester fibre. This will stop the leather from 'balling' the foam - a trick upholsters use.
The next layer on the seat is cling film. I wrapped the cling film around the whole seat. This is to prevent the foam from soaking up water should the seat 'leak' when riding in the rain - not that you would want to of course. I will also be moulding wet leather over this and I don't want the foam to take on any water.

Measure and cut the leather for the top and bottom of the seat. I left about 2 inches around the edges to aid moulding and fitting. Trimming comes later.
Mark up centre points on the leather and the seat pan. I used these marks to keep checking that my leather is always in the same place when doing the work.
Add the tooled pattern on the top piece. In this case the client wanted a very simple chevron pattern. I used a leather craft swivel knife to cut the pattern into the leather. No stamping or tooling was required for this project.
Mark out the rivet holes in the bottom leather piece to line up with the holes in the seat pan.

Soak the top leather. About 10 minutes in lukewarm water is enough. Soaking makes it possible to mould the leather.
Lay the leather over the seat and massage it around the foam to mould and shape. Because the leather has been soaked, it will mould easily. Once moulded, I leave it to dry out for a couple of days. The leather maintains the shape when it is dry.
Dye the underside leather piece.
Rivet the under piece to the seat pan.

Before I put the two parts together, I fed the flesh side with Sedgewick leather feed. There are two reasons for this. a) it feeds the leather and will help slow down drying and ageing. b) it waterproofs the leather. Even stored in a garage, leather will soak up moisture.
To make it easy to stitch the top to the bottom, I used contact adhesive. This is just to hold the leather together whilst stitching.
Next is dyeing the top. My dyeing process is one I have developed over time and is my own unique style of finishing. You will see examples of how I dye my items in my guitar straps and items such as this barrel bag and this dog collar. I used an oil dye, specially made for veg tanned leather from Northants Leather Chemicals. Because it is oil based, it does not dry the leather out as some other dyes do. It gives me a wonderful finish, especially if I am looking for a more antique look. It polishes to a beautiful shine.
Stitching comes next. This seat was hand stitched using traditional saddlers stitch. The thread I used is 1mm Tiger thread. I use this for it's strength and the fact that it is woven, so is more durable.

Nearly there... I trimmed the edge to as close to the stitch line as I dared (using an ultra sharp knife). The edge was sanded using 80, 180 and 1000 grit sandpaper. Using a sanding block I will bevel the corners very slightly. This method of finishing an edge gives me a cleaner look. (I don't use a traditional edge beveler (used to shave / bevel the corner along the edge of the leather) as I find this does not finish the edge to my satisfaction).
Instead of using an edge slicker, which will round and smooth the edges, I first dye the edge. Before the dye has dried I use a cloth and rub the edge until it is smooth.
Finally, the finishing - done in layers. First the feed and seal with Sedgewick Leather Feed, rubbed on sparingly with my hands. I find this the best way as the warmth of the hands helps melt the feed into the leather. (It's so good for the hands too!). I used a heat gun to melt the feed further into the leather. This is to feed the leather, waterproof it and give the leather longer life. To give me a shine, I use the same process that the army does to shine their parade boots called 'bulling'.
And that's it. One seat done.


